Category Archives: Technology

Cigars and Stars

Another month has flown by – we’re only a week away from Halloween! October began with Donna taking a trip to Bennington, Vermont to visit her parents. I drove Donna to the airport in the early morning of Tuesday, October 3rd. I had time after dropping her off for a quick breakfast and coffee before sunrise. Then I packed my photography gear and headed over to the Riparian Preserve in Gilbert. The first hour or so after sunrise usually has great light for photography.

I shot a few bird photos that I thought were nice. This hummingbird is puffed up, warming herself in the sunrise.

Female hummingbird

I shot a sequence of a snowy egret skimming the water and capturing a fish for breakfast.

The third photo of the sequence above shows the nice early morning light on the back of the egret’s wings. I also captured an image of cormorants in flight.

The cormorants are flying toward the sunrise and the light on their underside is very nice.

The glassy water reflects the image of these black-neck stilts.

Black-neck stilts

I also liked the simple composition of this black phoebe photo.

Black phoebe

Friday, October 6th was my birthday. Donna was away, but she left me a card with a gift certificate for RJ’s Cigars. This was just right as I planned to go to RJ’s Cigar Lounge and enjoy a top-shelf cigar for my birthday. I also want to give a shout out and thank you to long-time blog follower, Miriam Armbrester. Miriam sent me a birthday card. I really appreciate the fact that she took the time to select a card and send it to me in the mail. We met Miriam and her husband, Rand, when we were in Alabama in 2018. They treated us to lunch at the oldest restaurant in Alabama – I wrote about it here.

Donna came back from Vermont on Sunday, October 8th. During the month of October and into November, many of the winter snowbirds return to Viewpoint. Residents of the northern states and Canada return as the weather here cools and becomes downright cold in the areas they summer in. We’ve had slightly cooler weather with a few exceptions where we had very warm afternoons. The evenings are pleasant and overnights are much cooler now.

My last attempt at astrophotography was on our trip to our housesit in Cortez, Colorado. I was foiled by clouds there. The summer months of July through September were too hot here for astrophotography. Here’s the thing – I use dedicated astrophotogrphy cameras for deep sky objects. These cameras have electronically cooled sensors to capture the image.

Deep sky objects are so dim and so far away that long exposure times are necessary. If the image sensor gets too hot, it creates noise – that is, random pixels will glow in uncontrolled ways, making the image appear grainy and lack clarity. For deep sky photography, I like to maintain the sensor temperature at zero degrees Celsius (32 degrees Fahrenheit). My best camera is able to cool the sensor 35 degrees Celsius below the ambient temperature – others are capable of cooling 30 degrees Celsius below ambient.

In the summer here, it’s not uncommon for the ambient temperature to remain above 90 degrees (about 30 degrees Celsius) well after dark. This would mean my camera’s cooling system would have to run at 100% output continuously to try and cool the sensor enough. I don’t like to run it above 50% and once cool, it should maintain the temperature with about 25% output. Thus, I give up astrophotography here in the summer. I could photograph planets or the moon. These are such bright objects, they can be captured with very short exposures and do not need cooling. But I find it hard to motivate myself to set up my gear when it’s hot outside and doesn’t get dark until after 9pm.

Lately, the temperature has been dropping to around 80 degrees shortly after sunset. I still have some new gear that I bought earlier this summer, but haven’t been able to try out. While Donna was away, I set up here at the Northpoint Recreation Center in the Viewpoint Resort. I used my Player One Poseidon astro-camera for the first time. I had some technical difficulties the first night and had to give up. I went back out on October 4th and captured just short of three hours of usable 75 second sub-exposures. This is the Andromeda Galaxy, one of the first deep sky targets I attempted when I got into this hobby about 10 months ago. This is an improvement over my earlier attempt, but it needs more time to reveal the detail.

Andromeda Galaxy (M31)

Although this galaxy is over two million light years away from earth, it’s the closest galaxy to our own Milky Way galaxy.

I mentioned technical difficulties – they hit again the next time I went out. I was very frustrated and finally figured the laptop I was using, which was a refurbished unit I bought on Amazon had signs of impending hard drive failure. I bit the bullet and went to Best Buy and bought a better laptop with a 1TB solid state drive.

Unfortunately, the new laptop was loaded with Windows 11 – the old one was Windows 10. Most of the astrophotography open source (free) software I use was developed for Windows 10. I had to download all of the software programs and reconfigure everything. Some software, NINA for example, had to have new paths configured to communicate with other needed programs. NINA manages my session, communicating with as many as four other programs simultaneously. I’m not that computer savvy and it took a lot frustrating trial and error to get it working.

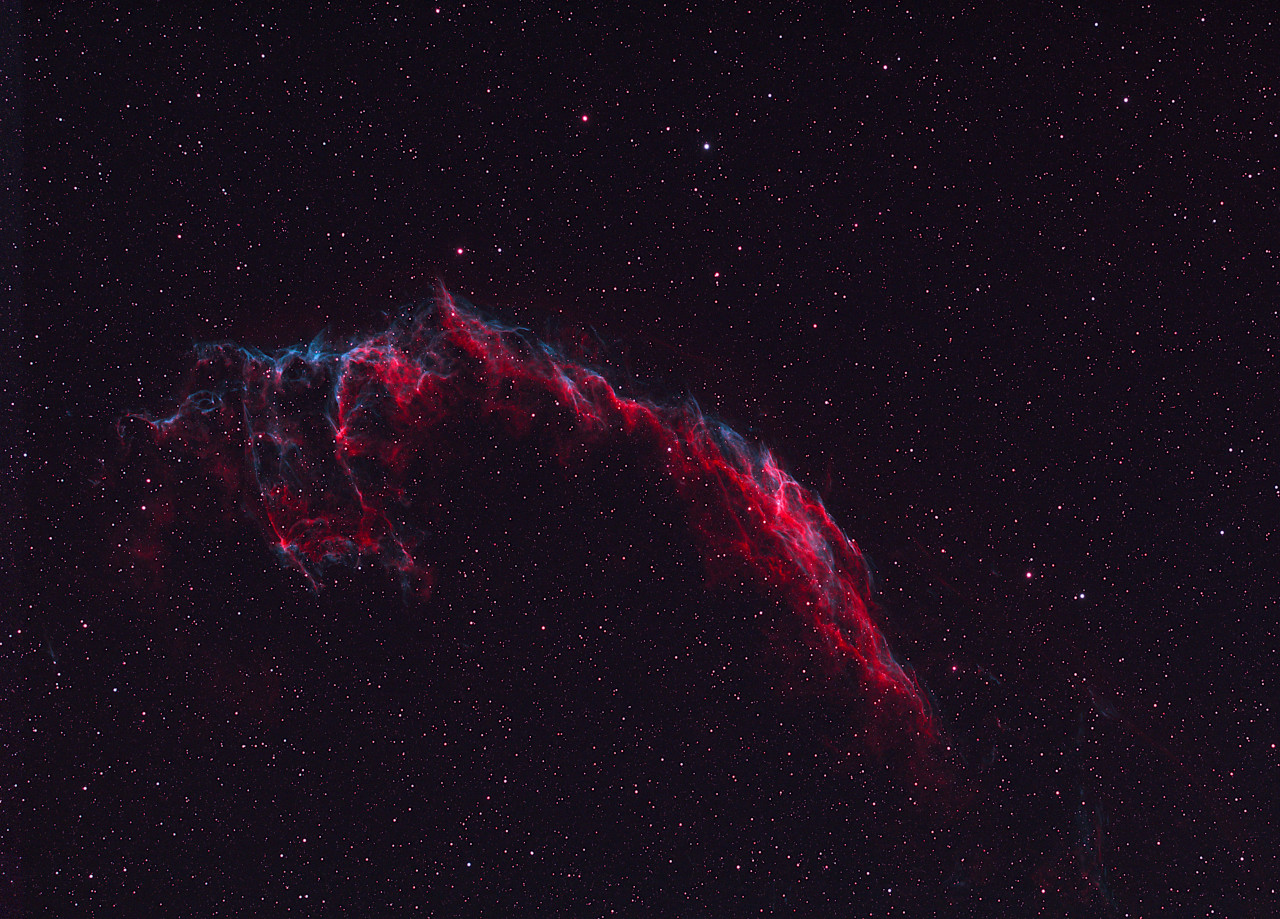
I’ve wanted to capture an image of the Eastern Veil Nebula for a while – it was to be my target when we were in Cortez, Colorado. It’s getting a little late in the year, but I went for it. My first session was full of technical issues that resulted in only 76 minutes of usable data.

After finally getting all of my gear and software to play nice, I added two more sessions for a total time of four hours and 23 minutes. This produced a nicely detailed view with vibrant, saturated color. The red areas are hydrogen gas and the blue is oxygen.

Eastern Veil Nebula (NGC6992)

The Eastern Veil Nebula is located in the constellation Cygnus. It’s part of a large supernova complex called the Cynus Loop. The entire loop is quite large with distinct areas of gas created when a large star (20 times the size of our sun) died. When stars die (supernova) the outer areas explode away from the core creating these vast clouds of gas, while the core implodes into a high density mass that may become a black hole.

In the photo above, you can see traces of hydrogen throughout, leaving a reddish cast. I might try to capture more of the Cynus Loop – the Western Veil and Pickering’s Triangle.

With Donna back home again, I’ve enjoyed some gourmet dinners. First I’ll share the sheet-pan chicken with shallots and grapes. Served over spaghetti squash, it was an interesting and delicious dish.

Sheet-pan chicken with shallots and grapes

Another goody was creamy scallops with fresh tomatoes.

Creamy scallops with fresh tomatoes and steamed spinach on the side

Although the thermometer flirted with 100 degrees last week, the week ahead and into November calls for highs in the low 80s and eventually down to the 70s. Looking forward to that!

Dirt and Sky

My energy levels and activity have been fairly low lately. Recovering from surgery is taking longer than I expected – I guess that’s what happens as you age. A couple of times per day I find myself overcome with fatigue and need a short power nap – but I’m making progress.

Speaking of progress, Donna’s raised garden bed is producing some good looking vegetables. She has tomatoes ripening, broccoli that looks amazing and collard greens along with a nice basil plant. It’s taking a bit longer for the veggies to ripen than we expected – the unusually cold weather has had a hand in that.

While the garden is Donna’s project, I manage the worm farming. We have an in-bed worm bin in the garden. The worm bin has openings in the sides that allow the worms to come and go freely and travel throughout the garden. I feed the worms in the bin, so the majority of them reside there.

The composting worms are red wigglers and they create an ideal soil with organic, natural fertilizer. The worms require a diet of nitrogen-based material – this is derived from kitchen vegetable scraps, peat moss and manure. They also need carbon based nutrients – I provide this by adding shredded cardboard to their bin. That’s right, they convert kitchen waste and cardboard into ideal garden soil. As they consume these waste products, they leave behind worm castings – a polite descriptor for worm poo. It contains beneficial bacteria as well as nitrogen, phosphorus and potassium – the NPK values you see on commercial fertilizers. Worm castings are natural, organic fertilizer that will not burn your garden plants – you can plant in 100% worm castings to great effect!

I started Donna’s in-bed worm bin with 300 red wigglers from Arizona Worm Farm. These worms dispersed – probably because her garden soil had so many nutrients they didn’t need to stay in the bin to feed. I added 300 more worms two weeks later and I feed the bin regularly.

Worm reproduction is interesting. Worms are hermaphrodites – that is they have both male and female reproductive organs. But it still takes two to tango. Once they’ve completed the dance, both participants are fertilized. They each produce cocoons that can hatch two to five worms. So, let’s say that one-third of the original 600 worms have an encounter – that’s 200 worms that will produce cocoons. Let’s say that two worms survive from each cocoon. Our 200 worms just produced 400 offspring. I think this represents a low estimate of the worms’ reproductive activity. For the past few weeks, every time I aerate the worm bin and add food, I find bunches of young worms. I have little doubt that Donna’s garden houses well over 1,000 worms now and the population will continue to grow.

Worm colonies are self regulating – that is, when the population reaches a saturation point where food and space become less than abundant, they slow or stop reproduction. Pretty handy.

Five weeks after I started the in-bed worm bin, I created a separate external worm bin. I used 20-gallon fabric pots called grow bags. I doubled two together for strength, added some garden soil mix, peat moss, perlite and cardboard. I started this bin with 600 red wigglers with the intention of creating a steady supply of worm castings for Donna’s potted plants and whatever else she grows.

Enough about worms – let’s talk astrophotography. When I decided to pursue astronomy last summer, I didn’t really know what I wanted from it. Like many beginners, I figured I should get as large a telescope as I could afford and skip past the beginners’ “toy” telescopes. I’ll have to delve into a few ‘scope dimensions to explain this, but I’ll skip the math equations.

My first scope was a Schmidt-Cassegrain reflector – it’s what’s known as a catadioptic telescope – often shorted to cat or just SCT (Schmidt-Cassegrain telescope). The Celestron NexStar 8SE I bought has a large objective (that’s the front lens opening on a refractor or the mirror size of a reflector type ‘scope) of 8-inches (203mm). It has a focal length of a whopping 2,032mm. Objective diameter and focal length are factors in determining how much magnification the ‘scope can provide.

I had a lot of fun looking at the moon and planets like Saturn and Jupiter. But I also found out that high levels of magnification also means unwanted atmospheric disturbances are also magnified. I soon discovered that I was most interested in taking photographs of the celestial objects rather than observing them through an eyepiece.

I bought a dedicated planetary astrophotography camera and captured a lucky image of Saturn. That really got me excited about astrophotography. I soon learned how lucky that image was. Most of the time, I couldn’t get the moon or planets in sharp enough focus as atmospheric conditions like temperature gradients and higher level winds (jet stream) made the image go in and out of focus.

The moon and planets are bright enough to capture with very short exposures. The trick was to get focused as sharp as possible, then start capturing frames with short exposure times – around 10 milliseconds or so. I would take 3,000 or more frames. Later, I sorted these frames by quality level in a software program, threw out the poor examples lacking detail and combined the best images in a stacking program. This yielded acceptable results, but they were still lacking.

There are a lot of great YouTube videos where experienced astrophotographers offer advice and tutorials. I learned that most of them agreed that starting out with a large, high magnification ‘scope would only lead to frustration. They almost universally agreed that a smaller refractor-type telescope would yield better results and even forgive some beginner errors. This allows far less frustration as you gain experience.

So, I found a small William Optics ZenithStar refractor with a 73mm objective and 430mm focal length. This was a treat for lunar photography, but a little small for planetary use. If you wanted to go past our solar system, it would excel at some nebulae and distant galaxy images – but I was still working on planetary photography.

Then I found my Goldilocks ‘scope – not too big and not so small. I bought an Astro-Tech 115EDT. This has an objective lens diamter of 115mm and a focal length of 805mm. I love this scope and also my W.O. Z73. I’ve become a refractor guy instead of a reflector ‘scope guy.

Here’s how the three ‘scopes fit my needs. The small W.O. Z73 with a focal length of 430mm works for lunar and deep-sky objects (DSO). The Astro-Tech 115EDT with a focal length of 805mm works for lunar and planetary – it will also be useful for DSO. The Celestron 8SE with a focal length of 2032mm is good for planetary and deep sky if the atmospheric conditions allow it.

But wait, there’s more. With the 115 EDT, I can use an accessory called a Barlow that effectively doubles the focal length from 805mm to 1610mm. Barlows have plusses and minuses, but I won’t delve into that here. It gives me enough magnification for great planetary images. With the 8SE, I can use another accessory called a focal reducer that effectively shortens the focal length. I have a 0.63 focal reducer for it that shortens the 2032mm focal length to 1280mm. So I have a lot of options now – focal lengths of 430mm, 805mm, 1280mm, 1610mm and 2032mm. That’s why I have three telescopes – and five focal length options.

A few weeks ago, I went to an area with less light pollution and tried to capture a deep-sky image of the Pleiades – a star cluster also called the Seven Sisters. My planetary experiences were no help here. DSO are a different game and have completely different requirements. Instead of short exposures of only milliseconds, you need long exposures – several minutes for each frame.

These long exposure create new difficulties and requirements to overcome them. Due to the earth constantly rotating, you must be able to accurately track the celestial position of your target. Otherwise, stars would go from pin-points to streaks across the image.

Digital cameras use sensor chips to convert photons of light into electrical impulses that can be recorded as data and later decoded into images. Astrophotography cameras typically use sensors developed by Sony Corporation and they are available in many configurations. My planetary camera uses a small chip size and doesn’t require cooling as the short exposure times don’t create much heat in the chipset. However, it doesn’t work well for long exposures as the chip overheats and creates noise in the image – that is, unwanted artifacts and false color or random white points in an otherwise black portion of the image.

Astrophotography cameras for DSO have cooled sensors. They usually have a thermo-electric (Peltier) cooling system that doesn’t use any liquid or gas cooling medium, it’s strictly electrical. This increases the size and weight of the camera not to mention the cost.

I went for it and bought a cooled DSO camera and a host of other accroutrements to begin DSO imaging. I run the cooling system of my ZWO ASI533MC deep sky astrophotography camera at a temperature of -12 celsius – that’s right, below freezing – it’s about 10 degrees fahrenheit.

This post has become too long-winded, so I’ll continue the DSO journey in another post. I think I’m ready for a nap now.

William Optics Z73 and tracking ‘scope set up for DSO imaging – I’ll go into the set up details in another post

RC Airplane Flashback

A couple of weeks ago, Donna introduced me to her friend, Deborah and her husband Scott. Turns out Scott and I had something in common. Scott flies Radio Controlled (RC) airplanes and competes in AMA Pattern. I flew RC giant scale airplanes and competed in IMAC aerobatic competition. AMA and IMAC have similarities, but compete under a different set of rules and utilize different types of airplanes.

AMA refers to the Academy of Model Aeronautics while IMAC is the International Miniature Aerobatic Club. AMA pattern planes are purpose-built designs that have to meet size and weight limitations to compete in pattern events, which require pilots to perform a schedule of aerobatic maneuvers and are judged on the geometric perfection of the maneuvers.

IMAC planes have fewer limitations, but are generally scale representations (or close to scale) of full-size aerobatic planes that compete in the International Aerobatic Club. Where AMA pattern planes can weight no more than 11 pounds, my last IMAC plane was a 40% scale Edge 540 with a 10-foot wingspan that weighed 32 pounds.

Last Saturday, Scott was competing at an event held at the Arizona Modelers RC Flying Field in east Mesa only a few miles from our place at Viewpoint Golf and RV Resort. I participated in an event at this field over 20 years ago! After lunch, Donna and I drove over to the airfield and watched the competition for a couple of hours.

AMA Pattern planes on the flightline
The chairs give a sense of scale – these airplanes are large yet lightweight

Donna’s friend and tennis buddy Deborah came out to the field shortly after we arrived to watch her husband compete. Scott told me Chip Hyde was competing – I knew Chip from the RC Tournament of Champions (TOC) days. The TOC was an international competition started by Bill Bennett in 1974 while Bennett was running the Circus Circus Casino and Resort in Las Vegas. Later, Bennett bought the Sahara Hotel and Casino and continued to sponsor the invitation-only TOC until his death in 2002. He put up over $150,000 in prize money for the TOC event each year.

Deborah and Donna

In the late ’90s, I participated in the TOC as a caller for Jason Shulman. The caller stands behind the RC pilot and calls out each maneuver for the pilot to keep him in sync with the schedule of maneuvers. The last time I called for Jason, we came in third behind Christophe Paysant–LeRoux from France and Chip Hyde from Las Vegas.

Enough background – I saw Chip and we chatted for a bit. He remembered me from 20 years ago – I was surprised by this. Chip was at the top of the game for a lot of years – and still represents the USA in international competition. He was the AMA USA National Champion pattern pilot 10 times. He was the Fédération Aéronautique Internationale (FAI) World Champion four times! It was fun to reminisce, but I quit flying RC airplanes after I won the IMAC National Championship twice and haven’t flown in years.

After my last post, I received a message from my friend, Leendert Hartoog. Lendert wanted to meet up and hear more about the Elekit stereo amplifier I built. We got together on Tuesday at Red, White and Brew and I filled him in with all of the particulars. After a couple of cold ones, I told him I would send him a couple of links for more information and ordering. When I got home and looked up the website for the US retailer, I found that Tube Depot had the kit on sale until midnight. I sent the link to Leendert and told him of the sale status – he ordered a kit. I told Leendert I would build it for him if he wanted me to, but I think he’ll want to experience building it himself.

I keep the stereo mounted on top of my guitar amplifiers – the vacuum tubes get hot and I wouldn’t anyone to accidently burn themselves. The 6L6GC output tubes run at about 330 degrees +/- 10 degrees or so. The 12AU7 preamp tubes are only about 180 degrees, but that’s still hot enough to burn fingers.

Amp corner – Elekit integrated stereo amp on top

Last Thursday, Donna made a bean soup with andouille sausage and spinach for dinner. It was a great meal on cold day – the temperature only reached 56 degrees that afternoon.

Bean soup with andouille sausage and spinach

She’s still following the Bright Line eating plan – it’s taken a few pounds off of me although I cheat and still drink beer. Saturday’s dinner was pan-seared chicken thighs with herb-roasted tomatoes and a side of asparagus.

Pan-seared chicken with herb-roasted tomatoes

On Sunday, she grilled shrimp with Mexican spices along with peppers and onions and served it with Mexican street corn and avocado. Delicious.

Grilled shrimp with peppers and onions and Mexican street corn

Saturday was 10 degrees warmer than Thursday’s 56 degrees. The pictures from the flying field show blues skies, but it was still on the cool side. Sunday was a little warmer and on Monday we hit the low 70s.

Yesterday we were back in the low 80s. Donna had me slice a flank steak and she made a stir fry for dinner. I had it over white rice while she had her serving over riced cauliflower to adhere to her eating plan.

Sliced flank steak
Stir fry beef

On Monday, I went to the Verizon store and traded in my Samsung Galaxy 5 which I’ve had for seven years or so for a new Samsung Galaxy S22. The guy there couldn’t believe I’d had the same phone for that long. Donna upgraded to an S10 a couple of years ago. My Galaxy S5 was first released in 2014. Since then they released the S6, S7, S8, S9, S10 usually in March of each year. In 2020 they changed their nomenclature to coincide with the year, so after the S10 came the S20 then S21 and now the S22. The S22 was released in the USA last Friday, so I’m truly up to date now.

Getting the files from my old S5 to the S22 was problematic. I have over 4,000 photos stored on the SD card in the S5 and it was running so slowly that the S22 indicated it would take four hours to load the data! I was trading in the S5 to get the discounted price of the S22 but the guy let me take both phones home and complete the data transfer instead of hanging around the Veizon store all afternoon. I really appreciated that. I got it done and returned the S5 to the store first thing on Tuesday morning. Now I have to learn the new phone – finding my way around it can be a little frustrating at times!

We should reach the mid-80s today and stay warm until the weekend when we have a couple of days back in the 60s forecasted. We’ll see how that works out.

Analog Man

FedEx was on schedule and delivered the Elekit TU-8200R stereo integrated amplifier kit I ordered from Tube Depot. Elekit is a Japanese company that’s been in business for about 40 years. They are well-known in Japan for the science project kits they sell to high schools. High schoolers in Japan build projects like robotics and other electronic devices with the Elekit supplied parts and manuals. They are also well-regarded for their audio gear.

Mr. Yoshitsugu Fujita is the Chief Engineer and designer for Elekit. His audio circuits are brilliant. Unlike most boutique stereo amplifiers, which rely on circuit designs originally developed in the 1950s and 1960s, Fujita-san designs outside of the box everyone else is stuck in. His audio gear is vacuum tube driven, but he has no qualms about using solid state devices in the power supply stage. If a DB107 solid state bridge rectifier creates a cleaner power supply, that’s what he uses. He also incorporates transistors in circuit protection schemes, but the signal path is all analog tube driven.

It’s all in this box from Elekit

I got to work right away after the delivery came at 1pm. Everything was well packaged and sorted into plastic bags.

Lots of parts

One of the key elements of this kit is the R-core power transformer on the left in the photo above. The two output transformers – also very key components – are in the left center of the photo. Once I inventoried all of the parts to ensure nothing was missing, it was time to populate the main board. Over the next five hours or so, I soldered over 200 points on the main circuit board. There are seven boards total to make up the amplifier. These are high-quality printed circuit boards (PCB) with thick fiberglass plates and copper traces on both sides that are well proportioned and 70um thick. The through holes are copper plated.

Bottom of the main board with components in place
Top of the main board

I finished the main board around 7pm and knocked off for the day – I was getting tired and I didn’t want to make an error in the build. Building a stereo amplfier is like building two amps at once. Each channel (left and right) has it’s own, separate signal path. Only the main power supply is shared in this amp.

Main PCB finished – all capacitors and resistors are high-quality parts sourced from Japan

Saturday morning after breakfast and coffee, I got back to work around 9am. Assembling the rest of the boards was straight forward. I had to knock off at 1pm to have lunch before going to Donna’s concert. The Viewpoint Concert Band had their first performance of the season. They have fewer musicians than in years past due to covid and other reasons – they’re down by about 30 performers. They sounded great though and put on a good show.

PCB 2 with volume control, switches and headphone jack

Before I started building this amp, I went Michael’s craft store and bought a pack of craft sticks. These look like a popsicle stick but they’re larger – about 3/4″ wide. I glued two of them stacked together to make it 1/8″ thick, then I cut down the width on one end to make it 3/8″ wide. This was my jig for bending the leads on resistors and setting them precisely 1/8″ clear of the board. I did this because resistors get hot and keeping them up from the board would allow air to circulate around them. I wanted a uniform height for aesthetic reasons. This would be an issue later.

There were a couple of places where PCBs are joined perpendicular to each other and tricky soldering was required. The PCBs had copper pads on each board that aligned with each other but didn’t make contact. I had to solder a triangular fillit that joined the copper pads. This was tricky because both pads needed be simultaneously heated to allow the solder to flow and adhere properly.

Twelve triangular solder fillits joining the copper pads of these PCBs

After the concert, I got started on the hardware mounting and had everything put together a couple of hours later. Total time spent on the project was around 12 hours at this point – eight hours or so with a solder iron in my hand.

Finished – or so I thought

I put tubes in the sockets and it was time to fire it up. I plugged in through my my bulb limiter connected to the APC Line R voltage regulator. It was a disaster. I had a loud hum. I switched it off and looked everything over. I tried switching tubes but the loud hum persisted. I tried a few tests and found the noise was unrelated to the volume control – no matter where the volume control was set, the hum level was the same. I also found that touching the volume control or the input jacks changed the hum – it was lower volume when I touched them.

This made me believe the hum was from a ground loop. I put a jumper from one input jack to a ground point on the chassis and it killed the hum. I hooked up the CD player for a test – no sound output. Bummer. Up to this point, I thought this was the easiest amp I’d ever built. The kit was high-quality and everything fit well. The instructions were good. Somewhere along the line, I must have been a little over-confident and made a mistake.

I pulled the boards out and reflowed the component solder points. I couldn’t see anything wrong. I put it back together and had the same result. I was getting frustrated and tired. It was past 7pm by then and Donna had dinner waiting. I decided to give it a break and think about it for a while.

I thought about it while sipping a Scotch on the rocks and finally gave up for the night. I woke up at 4:30am Sunday morning and thought about it some more. I couldn’t get back to sleep, so I got up as quietly as I could and went back to the amp at 5am. I reconfirmed all of the component locations and values. I can’t tell you how many times I took things apart and checked them – I wasn’t getting anywhere.

I had to take a break at 9am to meet Mike Hall at our coach – he was going to look at the damaged body panel that I temporarily repaired while we were traveling through Utah last summer. He came up with a plan for a permanent fix.

Then Donna and I drove to Scottsdale to meet Alana and Kevin at Merci French Cafe and Patisserie for brunch. Kevin and Alana had left the Painted Mountain Golf Resort in Mesa on Saturday and went to Alana’s mother’s place in Wickenburg – over an hour away. They made the trip back to Scottsdale to spend a little more time with us before flying back to Washington on Tuesday. We had an excellent brunch on the patio at Merci – eating out again for the fifth time in eight days. I was a little distracted, thinking about the amp problem.

When we got back home, I finally wised up and quit looking for a visual clue. Instead I measured voltages throughout the circuit. The schematic identifies 29 points to take voltage readings. All looked perfect until got to number 29. The reading was impossible. I should have had around 6 volts for the heater filaments, but I found -30 volts. What? How could I have negative voltage there?

Looking at the schematic led me to the solid state bridge rectifier. It was installed properly, so I scratched my head again. I was using a headset that resembles the one used by dentists to magnify things in front of their eyes. The one I bought had five different lenses with magnifying powers of 1x – for eye protection only, 1.5x, 2x, 2.5x and 3x. I used the 2x lens because it allows greater depth of field than the stronger magnification – above 2x, you have view from a precise distance or things get out of focus. It also has an LED lamp to make me look like a cyclops while lighting up the working area.

With this headset on, I was searching the board around the DB107 rectifier chip when I saw something reflect a tiny bit of light. There was a fine line of solder – no thicker than a strand of spider web – across two terminals of the rectifier chip. Bingo – this was enough to short the rectifier. I used a braided copper solder wick to clean it up the solder joint. That should take care of the lack of sound and the voltage issue, but it didn’t explain the hum or ground issue.

I traced the ground circuits and resoldered the triangular fillits where the grounds went from one PCB to another. Then I put it all togther without the top plate on the chassis. I plugged everything in and it was silent – no hum. I turned the CD player on and I had sound. Hooray, I fixed it. All along, Donna kept reassuring me by saying, “You’ll find the problem, I have no doubt.”

I took the amp back to the bench and put the top and front cover plates on. I plugged everything back in and put on some music. Oh, no! Now I had nothing coming from the left channel. I took it apart again and traced back from the left channel input jack. Fujita-san cleverly marked all of the left channel components with odd numbers and all of the right channel components with even numbers. So I went to the resistor R1 to start checking and I found it bent with the lead touching the lead of R3 mounted perpendicular to it. This shorted the signal path to ground. Remember how I set the resistors all 1/8″ high? When I put the chassis back together after I fixed the original problems I must have accidently pushed R1 over onto R3. Problem solved.

This stereo sounds fantastic. It’s unbelievably good. Donna doesn’t exactly share my passion for chasing tone and good sound. When I say something like, “Listen to that bass and how clear the highs sound,” she usually says she just wants to enjoy the music, not dissect the sound. But when she heard this amp for the first time, right away she said, “That really sounds good!” The amp looks good to me in a simple, somewhat industrial way.

Elekit TU-8200R vacuum tube stereo integrated amplifier

Tube amps do sound good. I know, I’m a retrograde analog man in a digital world. But vacuum tubes naturally create an emphasis of second order harmonics – that is, they accentuate the octave above the fundamental frequency. Acoustic instruments naturally do the same thing. It’s a euphonic response and people find the tone pleasing. Solid state amplification creates higher odd order harmonics – the 3rd, 5th, 7th, etc, of the fundamental which most humans perceive as harsh or even unpleasant. Solid state designs require complex circuitry to try to work around this.

In my last post, I mentioned my concerns about the future availability of CD players. I decided to buy the Cambridge Audio AXC35 player after thinking about it for a day. I went online to Crutchfield and found out they had sold out since I last saw it the day before! Luckily, I found it on Amazon for the same price and placed the order. I went with the Cambridge Audio unit which is made by a company based in London, England because of the Wolfson Digital to Analog Convertor (DAC) in it. The Wolfson DAC is made by a company in Ireland and is a very good DAC. The DAC is a key component of a CD player.

Information stored on a compact disc can’t be amplified directly into music. The information is a series of microscopic pits in the disc separated by lands. These become a series of zeros and ones. The DAC takes this information and converts it to a waveform that represents the frequencies of sound. This waveform can now be amplified and sent to a speaker. Magic!

The Cambridge Audio CD player arrived on Monday. Now my stereo system is complete – new CD player, new amplifier and new speakers. It sounds so good, I can’t put it into words.

Cambridge Audio AXC35 CD player

Enough stereo talk – let’s get to the food. Thursday night, Donna made garlic butter chicken with riced cauliflower, mushrooms and asparagus. She seared the chicken thighs on the stove top, then baked them in the oven

Garlic butter chicken

Donna is back on the Bright Line Eating plan, which means I’m sort of on the plan. But I get to cheat some. Monday she grilled wild caught Alaskan salmon and served it with Brussels sprouts in bacon horseradish sauce.

Grilled salmon and Brussels sprouts

Last night ,she made lemony shrimp and bean stew – this was a new dish for us and really tasty.

Lemony shrimp and bean stew

Alana and Kevin picked a great week for their visit. The temperature was around 80 degrees everyday. Early this morning, that changed as rain moved in and we’ll be lucky to see 60 degrees today. The forecast looks good though, as we should be in the 70s by Friday.

*Just so you know, if you use this link to shop on Amazon and decide to purchase anything, you pay the same price as usual and I’ll earn a few pennies for the referral. It’ll go into the beer fund. Thanks!

Compact Discs, Family and Food

We’re ten days into February already. My perception of time gets more and more skewed as I age. We’ve been set into daily routines for most of the past week with a couple of exceptions. I haven’t been on the pickleball courts as much as I would like for a couple of reasons. First is the club’s scheduling – I can’t make much sense of how they are scheduling the courts for different levels of play. Most of the 3.5 play is 8am to 10am – I don’t play my best first thing in the morning. The other issue is wind – we’ve had a stiff breeze most mornings and I find outdoor pickleball in gusty wind to be an exercise in frustration. It becomes a game of chance, not so much skill.

A few weeks ago, we had visitors for happy hour. I had music in playing on the stereo at low volume for background sound. My friend commented that it sounded so clear and detailed. This was before I started upgrading my system and I wondered what he meant – it seemed pretty average to me. I thought about it later and came to the conclusion – it’s the general dumbing-down of sound quality.

My friend is used to streaming online music sources or MP3 files on an iPhone. These sources are so compressed that the music lacks the original detail and dynamics. He probably hadn’t listened to a compact disc in years. I read recently that last year (2021) was the first year to post a year-over-year gain in CD sales in the last 15 years! In fact, during that period, sales of vinyl records exceeded CD sales. Maybe people started to wake up and forgo the convenience of music files versus high-quality recordings. Nah, I doubt it – in the end, convenience wins.

My new Klipsch Reference R-51M bookshelf speakers arrived last Saturday. After about 12 hours of break-in and careful positioning, they sound great! The bass response is a big improvement over the Celestion DL4 speakers I had. To be fair, the Celestions are about 30 years old and the crossover network could probably benefit from fresh capacitors. But there’s no denying the bass reflex design with a rear firing port on the Klipsch speakers allows a much deeper and more powerful bass response. In fact, my Nobsound vacuum tube stereo amplifier sounds better than I ever expected it would. There’s no turning back now.

Klipsch R-51M with Tractix horn tweeter and spun copper woofer
Klipsch R-51M with grill cloth in place

Like the Celestion speaker, the Klipsch R-51M is a two-way design, meaning it has a tweeter for higher frequencies and a woofer for bass and mid-range controlled with a crossover network. Their designs differ though – Klipsch is famous for horn designs and this bookshelf speaker uses a 90-degree tractix horn tweeter and an injection-molded graphite spun copper woofer. I’m really happy I went for them.

Hopefully I’ll receive a package from TubeDepot tomorrow. I’m going to build another amplifier. I ordered the Japanese Elekit TU8200R kit. I think this will become my main stereo and I’ll set up my old speakers and the Nobsound amp in my ham shack.

I’ve read some alarming reports predicting the demise of CD music players. Here’s the situation and possible outcome. First of all, CD sales have been slow although they picked up a little steam last year. Right now, there’s a worldwide shortage of integrated circuit chipsets. This has impacted most consumer goods – everything from cars to cell phones. With CD players now a small player in consumer electronics, manufacturers aren’t prioritizing CD players for their precious chipsets – they have other goods to manufacture that are in higher demand. This in turn means that manufacturers aren’t buying the disc transport mechanisms that load CDs into the player – which means the companies that usually supply these components are moving on to other goods.

I looked at Amazon and Crutchfield and my findings seem to support this theory. Crutchfield lists 12 different CD players in their catalog, but 10 out of 12 are out of stock with no date for resupply. I have a lot of music on CDs and would hate to lose the ability to play them. Our Pioneer CD player is about 30 years old and sometimes can’t decode a disc that has dropouts. I think I’ll buy a new unit and relegate the Pioneer to the ham shack.

Donna’s golf game is improving quickly. Last week, she played her fifth game ever on the nine-hole course here at Viewpoint Golf and RV Park. She hit a bogie on one hole, made par on another and birdied a hole!

Last Sunday, we had a delightful brunch at OHSO Brewery in Gilbert with our friends Sara and Howard Graff. After brunch, we strolled the streets of old downtown Gilbert. It’s a fun place – I can remember when it was a one-horse town that was little more than a water tower and crossroads. I neglected to take photos.

On Tuesday, my daughter, Alana and her husband Kevin (collectively known as Kevlana) flew down from Washington. We had a cold one on our deck along with my middle daughter, Jamie. Then we piled into Jamie’s Passat and went to dinner at Alessia’s, an Italian restaurant a few miles from here.

Poorly focused photo – Alana and Kevin on the left, Donna and Jamie on the right

The food was excellent and we thoroughly enjoyed the time together. Yesterday, Kevin and Alana came over to golf the nine-hole course with Donna. Kevin and Alana are avid golfers and Kevin is quite good at it. Afterwards, we enjoyed lunch at Fat Willy’s, the restaurant here at Viewpoint.

Last night, we went out to eat with Kevin and Alana again at the Zushi Japanese Bistro and had Japanese beer – Kirin for me, Kevin and Alana, Asahi for Donna – and enjoyed miso soup and a platter of sushi.

Speaking of food, Donna came up with a couple of new dishes for us last week. She’s been meaning to try her hand at pizza for a while and finally got to it using the method her parents use as well as one of their old pizza pans that she brought back from her last visit.

Homemade pizza

The pizza was good, but she thinks she can improve the crust. We both thought she could use a little less sauce, but that’s just our thoughts – there wasn’t anything wrong with it.

She also made a chalupa dish by slowly cooking a boneless pork shoulder with dry pinto beans, green chiles and spices for about five hours on the stove. It was very tasty but made enough food to feed a football team. She served it over corn tortillas fried in olive oil and with a topping of tomato chunks, red onion, cotija cheese, cilantro and lettuce.

Chalupa hidden under the toppings

We vacuum packed the leftover and put two packages in the freezer – enough for two more dinners and two more lunches – a total of eight more servings.

Kevin and Alana picked the right time for an Arizona visit. It was cold last week by local standards with highs of only around 60 degrees. But that changed by Tuesday when we had upper 70s and hit 81 degrees yesterday – making an enjoyable, sunny morning on the golf course. The forecast calls for daily highs around 80 degrees for next week.

*Just so you know, if you use this link to shop on Amazon and decide to purchase anything, you pay the same price as usual and I’ll earn a few pennies for the referral. It’ll go into the beer fund. Thanks!

Making It a Keeper

I got busy last Friday. As I mentioned in my last post, Gleeson Mechanical was scheduled to replace our air conditioner/electric heater with a Day and Night heat pump. Things started off slowly as they didn’t show until nearly 10am, then they had to return to the shop because they forgot some necessary item. They didn’t really get started until nearly 11am.

The two guys they sent out were efficient and the installation was completed by 2:30pm. They did a good job and hauled the old unit, including all of the underfloor ducting away. We have a new heat pump, new ducting, new return box and a new thermostat. It works really well. The only gripe I have is this – I told them to be aware of the property line. Our lot is narrow – all of the Viewpoint lots are narrow. They placed the unit carefully, but they ran the evaporator drain line over the property line, creating a trip hazard for my neighbor when they walk the path to their back deck.

New A/C and condensation drain line on our neighbor’s walkway

Our neighbors, Steve and Deena said they weren’t concerned about the drain line.

Meanwhile I received a delivery. A few weeks ago, I ordered a set of hand wound pickups for my Stratocaster guitar from Adam Asmus (Tone Hatch Pickups). His site showed a two-week wait for the pickups to be wound and he shipped them exactly two weeks later from Norfolk, Nebraska. However, it took the USPS a week to get them past Omaha, Nebraska.

I went to work on it right away. I removed the pickguard and old pickups, then installed the new ones and soldered it all together.

Pickguard with original machine wound pickups
Tone Hatch pickups hand wound by Adam Asmus

I’m still tweaking the pickup heights, but these are very smooth sounding pickups with what I can only describe as a richer tone. I thought I would lose some output with these, but I don’t really notice a change in volume.

If you know me or have followed this blog, you know I like to build and play vacuum tube guitar amplifiers. The warm tone of vintage-type guitar amplifiers and the feel when you drive them hard can’t be duplicated in my opinion. Recently I started looking at vacuum tube stereo amplification.

Stereo amplification is much different than instrument amplification. In a guitar amplifier, a certain amount of distortion is desirable – you want the ability to increase the sound level of the guitar and create everything from a clean sound to an over-driven distorted, fat tone.

In stereo hifi amplification, you’re aiming for a transparent gain in sound levels while faithfully reproducing the original tones. I became intrigued by the idea of low-power, single-ended, class A amplification. I learned a lot from Steve Deckert’s website for his Decware amplifiers. I would love to have one of his Decware Zen Triode amps, but the cost of an entry-level Decware is about $1,000 and there’s a long waiting list to buy one – it could take eight months or more before I could have one built. He hand builds everything. This is only a 2.3 watt amplifier. If you wonder how 2.3 watts could drive a speaker, check out his website.

I did some looking around and found affordable alternatives made in China. These obviously don’t have the same build quality, but there are people who have documented the shortcomings and how to fix them and come up with a reasonably good sounding amplifier. After researching a bit, I decided to try an amp made in China by Douk Audio and sold in the US under the brand name, Nobsound.

There are two reasons I decided to try this amp – first, it’s affordable at $315 on Amazon. Then, most of the issues on this amp are documented and fixes are easy. It’s a hand-wired, point-to-point (PTP) chassis that’s easy to modify. I figured this would get me in the door of stereo hifi amplification without breaking the bank.

Nobsound 6P1 integrated stereo amp – photo from Amazon listing

They list this amp as a 6.8 watt amplifier, but I think that’s wishful thinking. It may be able to generate 6.8 watts of power, but the distortion level would be unbearable way before you got there. It’s really a 2 or 3 watt usable power amp.

Amazon delivered the amp on Friday and also delivered another product I needed for this amp. Douk Audio made a few questionable choices in components for this amp. Many of the early adopters of this amplifier complained of tubes burning out and if the rectifier tube burned out, they didn’t know how to diagnose and replace it – they just wrote it off as a cheap Chinese throwaway amplifier.

There are a couple of reasons this happened. First of all, Douk Audio sends these amps to North America for Nobsound with the same power transformer used in China. The thing is, China household voltage is nominally 110 volts. In North America 120 volts is the norm and it’s not unusual to see 122 or 124 volts at the wall outlet. The power transformer at 120 to 124 volts was supplying higher than specified voltages throughout the amplifier, killing vacuum tubes.

To counter this, I ordered an APC Line-R 1200-watt regulated power supply. It has three settings for the output voltages and can handle up to four devices connected to the output totaling 1200 watts. One of the settings is 110 volts. I measured an actual 108 volts with the 110 preset on mine. This should be fine. This unit costs about $60, so now I’m $375 into the project.

Power regulator

I connected the amplifier through the APC unit and connected my Celestion Bookshelf 8-ohm speakers. These aren’t the highest efficiency speakers and I hoped I would get enough volume out of them. Speaker efficiency is rated with a specification called sensitivity. A one watt, 1kHz signal is applied and the sound pressure level (SPL) is measured one meter from the center of the speaker. My speakers are rated at 89db – the minimum sensitivity recommended by Steve Deckert for low-watt use.

I was surprised! The amp sounded decent and had no problem driving the speakers. But, there was more to do. The vacuum tubes supplied with the amp were mostly good quality Russian military grade surplus tubes. This included the rectifier tube – I think Douk Audio figured they could address the rectifier failures by upgrading to the Russian tube instead of the cheap Chinese tube originally used and I hear is still in use in the China market. This would get them past the warranty period.

The power tubes are very cheap Chinese tubes. The Chinese tube is designated 6P1 and is a copy of the Russian 6P1P (6П1П in cyrillic). The tubes supplied with the amp are poorly made with a dirt-like contaminate visible inside the glass tube envelope. It’s like looking through a very dirty window. I tried scrubbing the glass with steel wool to see if it was on the outside – it’s the inside of the tube! I ordered two matched pairs of 6P1P – EV (6П1П-EB in cyrillic). Although this is a single-ended tetrode amp, it’s unusual in that two tubes are wired in parallel for the output of each channel – thus the need for matched pairs. This cost $60, so now I’m $435 into it.

Russian military grade 6P1P tube

I bought these tubes from an outfit called Riverstone in California. They are new old stock Russian military surplus made in 1985 and 1987 at the Svetlana factory in Saint Petersburg, Russia. This plant was built by RCA in 1937. The EV or EB suffix indicates an extended-life, ruggedized tube and these have the OTK quality control codes.

Cheap, contaminated Chinese tube on the left, NOS Svetlana tube on the right

No major tube manufacturer makes these tubes anymore, just a couple of small Chinese companies do. Luckily, there are large stockpiles of the NOS Russian high quality tubes still available. The change in output tubes made a huge difference in sound quality. The frequency range was extended, reproducing higher highs and lower lows, the difference was dramatic.

But wait, there’s more. Douk Audio has another design flaw. In the power supply, they used two 150uF electrolytic capacitors – one after the rectifier tube and one following the choke. For the rectifier tube, this is bad news. I’m guessing they did this to simplify inventory and cut costs by stocking a boatload of capacitors of the same value. The thing is that larger, higher capacitance filter capacitors to smooth ripple in DC current can be a good thing. But, there is a limit and too much isn’t necessarily better. The rectifier tube is a Russian 5U4C tube which is equivalent to the RCA 5Z4. RCA’s datasheet specifies no more than 40uF – the Brimar datasheet for this tube is more conservative and specifies 33uF maximum. Well, 150uF is too much and places undue stress on the rectifier tube.

So, I ordered a Vishay Beyschlag 22uF 450 volt electrolytic capacitor made in Austria from Digi-key to replace the 150uF Chinese one. I also ordered four high-quality Solen 0.22uF (220nF) 650 volt capacitors made in France to replace the no-name brand Chinese coupling capacitors. With tax and shipping, it was another $30 – making this project cost a total of $465.

Weird colorshift in this photo – this is the original circuit and the power transformer is clearly marked 110V
Correct color temperature – new capacitors installed – 22uF filter cap is the blue one on the center/right – coupling caps are the black ones

The wiring and solder connections inside the amp are tidy and impressive. I expected to reflow bad solder joints, but I didn’t find any bad ones. The cap replacements took me a lot longer than I anticipated. I told Donna this was because, in my usual fashion, I spend extra time looking for a part or tool I had in my hand a few minutes before. This can add 10-15 minutes to the job. Then I spend time looking for a small fastener or item I dropped and spend another five or 10 minutes on my hands and knees looking for it.

At the end of the day, I have a very delightful little single-ended class A vaccum tube amp for under $500. Can’t beat that! Last night I was listening to an acoustic guitar piece by Ronnie Earl and the sound reproduction was so clear, I realized I could hear his fingers sliding along the strings on chord changes! It was like he was sitting in front of me playing his guitar. Now that I know this amp is a keeper, I’ve ordered back-up vacuum tubes to have on hand, although these Russian military grade tubes should be long-life items.

Tubes and VU meters on the Nobsound glowing in the dark

On Sunday, our friend Sini flew in from San Diego. Donna picked her up at the airport and they had fun plans for the next few days. They made it into a girls retreat by renting a room at the Westgate Painted Mountain Resort and planned hiking and horseback riding activities. Last night, we all went to Baja Joe’s for a Mexican seafood dinner – Sini’s treat. Thanks, Sini!

Dinner at Baja Joe’s

Donna took Sini back to the airport this morning. I’ll add some photos of the hike and horseback ride in my next post as this is getting too long already.

Speaking of seafood – as I stated above, Friday was a busy day, but Donna topped it off with a dinner of walnut crusted tilapia with broccoli on the side.

Walnut crusted tilapia

The weather has remained pleasant with daily highs around 70 degrees and overnight lows in the upper 40s to 50 degrees. The mornings have had some high clouds that burn off before noon, but yesterday, we had some sprinkles of rain. It wasn’t much – I was on the pickleball court giving my coaching clinic and we managed to play through the short, light shower. The week ahead doesn’t show any significant changes.

*Just so you know, if you use this link to shop on Amazon and decide to purchase anything, you pay the same price as usual and I’ll earn a few pennies for the referral. It’ll go into the beer fund. Thanks

Typhoon Karen

I’ve fallen behind on posting – it’s December already! I hope you all had a safe and enjoyable Thanksgiving. We had a great day with a Thanksgiving potluck feast with friends at Mike and Jodi Hall’s house. We watched football while Mike and I enjoyed cigars and, of course, ate lots of good food.

I received an unexpected piece of mail from my sister before Thanksgiving. It was a publication of the US Navy called Crossroads from November of 1962 – it took me back in time to another Thanksgiving. In November of 1962, I was six years old and our family lived on the island of Guam. Guam is a US territory in the western Pacific (Micronesia). The tropical island has an area of 210 square miles and great beaches with coral reefs.

I learned to snorkel inside the reefs when I was five years old and still love snorkeling in the ocean whenever I can. On November 11, 1962, Typhoon Karen hit the island dead-center. It was the most powerful tropical cyclone to ever hit the island and the 185-mph winds were devastating. The 20-page Crossroads paper my sister, Cori, sent me was entirely devoted to coverage of the typhoon and its aftermath. She had kept it for almost 60 years – I had no idea.

The island was wrecked – 95% of the homes were damaged or destroyed and more than 45,000 people were left homeless. We were lucky – we got through the storm without damage to our home after a long, scary night in total darkness. In the morning, we found twisted metal wreckage in our backyard – someone’s carport had been swept up by the wind, twisted into an unrecognizable shape and deposited in our yard.

Along the highway, we saw fishing vessels – sizable boats – along the roadside more than a quarter of mile away from the marina.

Rear Admiral John F. Coye, Jr wrote, “We in Guam have learned the true meaning of Thanksgiving Day. We have witnessed the devastating forces of nature, and our lives have been spared. Let us pause for a prayer of thanks and redouble our efforts to rebuild Guam. Guam was good and we’re going to rebuild it better.”

It was hard to believe only 11 people lost their lives amid all of the destruction. We left Guam soon after the typhoon and moved back to California. If you’re interested in reading more about the typhoon, here’s a link to a Wikipedia article.

I wrote about the oscilloscope I bought in a previous post. It’s something I’ve wanted for a long time. When I was younger, oscilloscopes were very expensive instruments – even a Radio SHack Heathkit model would set you back about two weeks worth of wages. Nowadays, digital technology can make them inexpensive – the Rigol model I bought was under $300. I’ve been having fun playing around with it – it’s nice to be able to visually track the electronic signal through various stages of amplification in my guitar amps. Donna thinks I’ve become a bit of a nerd watching YouTube videos to learn how to effectively utilize the oscilloscope.

One of the things I found was I had deferred maintenance for too long on a couple of my amps. I had replaced vacuum tubes in my Trainwreck and Marshall 18-Watt amps that I built nine or 10 years ago, but that’s about all I did. Time plus wear and tear from riding in the basement of our motorhome took a bit of a toll. I could see some noise in the signal path and could also hear how they were noisy compared to the Trinity OSD I recently built.

I took a little time to re-solder a few components and used a product called DeoxIT to clean the tube sockets and potentiometers. Much better! I watched a YouTube video where Mike Zaite – designer and owner of Dr. Z Amplification described his recommended annual maintenance. I’ll put that schedule in place for future maintenance of my amps. He also said why he uses vintage Russian military spec vacuum tubes in his Maz18 amps. He likes them because they sound good and are very robust – he thinks they should last at least 5,000 hours. He has a large stockpile of tubes that he bought from a retired Russian military officer – I wonder how that guy came upon a large quantity of surplus military tubes.

I saw another video where Mark from Gary’s Guitars in Portsmouth, New Hampshire went on about the old Russian military vacuum tubes. He once lived in Russia and he said every major city had radio parts swap meets at the time. Buying a transceiver in Russia wasn’t easy back then. People would scrounge parts and build them. He is a big fan of the old tubes from the Foton factory (it burned down in the early 1970s) and the Reflektor factory.

Gary said to look for a code which is OTK plus a number. That indicates the tube was inspected and passed military specification. In the old days, the quality control inspectors for the military were very thorough – passing a defective tube would result in a new assignment in Siberia. He also showed how to read the date codes. A while back, I bought some Reflektor 6V6 equivalent tubes that I thought were from the late 70s or early 80s. After checking the date code, I see they’re from 1974 – the year I graduated high school.

I found some old Russian military EL84 equivalents on eBay that are what I use in the Marshall 18 Watt. I ordered four of them and they came from the Ukraine! These are dated 1972 and are from the same Reflektor factory and have OTK codes. I read the Reflektor plant produced up 50 million tubes per year back in its heyday.

Ebay package from Ukraine

Now that I had my amps back up to snuff, I suddenly heard noise and sound dropping out while I was playing my guitar. Then it quit making sound altogether. Wouldn’t you know it, my Stratocaster-style guitar that I built last month was on the fritz.

I did some trubleshooting and found problems in the treble bleed circuit. I replaced the resistor and capacitor there – I always fix anything I find out of order when troubleshooting – but that wasn’t the problem. An open treble bleed circuit wouldn’t stop the signal from getting out of the guitar. I played around with it for a whole day and the problem was intermittent. It would work fine on the bench, but once I put it all back together, it quit working again.

Treble bleed circuit on the volume pot circled

The problem seemed to be centered around the volume potentiometer. I ordered a new pot from Amazon and got it the next day. I checked it and it was fine, so I installed it and it wasn’t fine. It seems like the wiper or carbon strip inside warped when I soldered it. This puzzled me as I know I didn’t overheat it – I’ve soldered lots of pots. I looked at the CTS branded pot more closely and I suspect it’s a Chinese counterfeit, not a genuine CTS pot. Yesterday, I drove to west Mesa and bought a volume pot at Milano’s Music. This was a CTS genuine article.

I installed the pot and replaced the wiring from the pot to the output jack. It works again! I plugged into my Dumble-style OSD and made lots of noise – I mean music. By the way, I never believed I would play or own an amplifier that I liked better than my Trainwreck-inspired amp, but the Dumble-style OSD tops it. It’s my all-time favorite.

Monday night, Donna made a new dish for dinner – it was Creole shrimp. It was bit labor-intensive with thinly sliced celery, onions and peppers, but it was so tasty.

Creole shrimp – the photo doesn’t do it justice

I won’t be eating such fancy dishes over the next few days. Donna’s flying to San Diego tomorrow morning to visit her sister, Sheila. She’ll be back on Saturday night.

The weather cooled considerably over the past week. We had highs around 70 degrees and overnight lows in the upper 40s. The week ahead calls for upper 70s to low 80s with overnight lows in the mid 50s. December in the Valley of the Sun – you gotta love it.

Dumble Mania

Donna has been on a mission lately. She’s intent on making our park model house here in Viewpoint Golf and RV Resort our home. By that I mean she’s continuing to transform the look and feel of the place. She started last week by cleaning out the shed and patio areas and getting rid of a lot of unwanted and unneeded stuff.

Then she ordered patio furniture for the side deck along our entrance and carport. She picked up potted plants to decorate the patio. We moved the big gas grill from the back of the carport to the side deck to make it easier to access. The patio furniture she bought required “some assembly.” She intended to do this herself, but ran into issues from the get-go. I pitched in and saw why she was having trouble. First of all, the instructions were very poor – Chinese translations that were nonsense. Then there were the tools provided – a thin spanner stamped out of sheet steel and an allen wrench.

The first thing I did was break out proper tools. Donna quickly saw the reason why I like having the proper, quality tool for the job. We got it done in less than an hour.

Donna enjoying her morning coffee on the new patio rocker

Meanwhile, I’ve been obsessed with building my Dumble-style guitar amplifier. Dumble amplifiers have an interesting history, but first let me tell you about a guy named Ken Fischer.

Ken Fischer learned electronics while he was in the navy. Later, he started a business repairing televisions and radios. He became an engineer with Ampeg – a company that built amplifiers for musical instruments and public address systems. He left Ampeg in 1967 when the company was sold to Magnavox – he wasn’t interested in the corporate culture.

He made a good living repairing and modifying Marshall amplifiers in his basement. Around 1982, he built his own amplifier design that he housed in a polished wood cabinet and called it Trainwreck. He didn’t put serial numbers on his amps – he stamped the chassis of each one he built with a woman’s name. His first one was named Ginger and the last he built was Kaylene. He made approximately 300 amps and they were each voiced for the individual that ordered it – no two were exactly the same.

He built amps for Mark Knopfler (Dire Straits), Billy Gibbons (ZZ Top) Eddie Van Halen, Brad Paisley, Glen Kuykendall, Matt O’Ree and many other famous performers. He had a long history of health issues – something called chronic fatique immune dysfunction – and he passed away in 2006. His amps are highly sought after and fetch prices in excess of $30,000 today. They are also copied (cloned) by a number of manufacturers such as Dr Z, Komet and others. The Ken Fischer design is notable for its touch sensitivity – you basically set up the amp controls how you like and then forget it. Just by varying your pick attack and the volume knob of the guitar, you can get anything from crystal clear, clean guitar sounds to Eddie Van Halen distortion. This circuit is popular among home-built amplifier hobbyists. I built one in 2012.

My Trainwreck-style home built amp

Then there’s Howard Alexander Dumble. He’s about as eccentric as they come, but no doubt he’s also a genius. When he was in high school, he built transistor radios that he sold to classmates. Before he was 21 years old, in the early 1960s, he was contracted by Mosrite to build amplifiers for the popular instrumental band, The Ventures. Mosrite wanted to create an amplifier building company with him, but he wasn’t a corporate type and declined the offer.

He was making a good living repairing and modifying Fender amplifiers in the 1960s. Somewhere along the way – I think it was in the 1970s – he began making his own amp designs. He wasn’t interested in mass production, he made each amp to order much like Ken Fischer’s Trainwrecks. But, he was unusual in that he required an application from prospective buyers and he auditioned the buyer to decide if he could make an amp for that player – he needed to know how proficient the player was and what the style of playing was. He probably turned down as many applications as he accepted – at least that’s the folklore.

He also required each customer to sign a contract that included secrecy clauses – they weren’t allowed to let anyone open up the amp for service or to see his circuits. After getting burned and having some of his design copied, he started gooping his amps. He covers the circuit board in epoxy or RTV silicone after he builds it so no one could see what he actually used to make it.

He was known as Howard in the early days, but later insisted on being called Alexander or Alex. On the guitar forums, he’s called Mr. Dumble or his initials, HAD are used. He made a few different variations but his most popular was called OverDrive Special (ODS). A few of these were reverse engineered – most notably numbers 104, 124 and 183. They are another amplifier that’s popular among the home-built crowd, but they are very challenging to build. Both the Trainwreck and Dumble amps require much attention to detail and lead dress (routing of the wiring) is crucial or you’ll end up with a humming, squealing mess.

Many top performers used Dumble amps – Eric Clapton, Larry Carlton, John Mayer, Robben Ford, Carlos Santana, Stevie Ray Vaughn, Joe Bonamassa, Eric Johnson, Keith Urban and many, many more. His amps are the priciest on the planet. In the 1980s, he was selling them for $4,000-$6,000. But on the used market, people paid more than $20,000 for one. He raised his price accordingly. Right now, a used Dumble previously owned by Joe Bonamassa is listed for sale at $139,999!

I’m currently building a kit patterned after ODS #124. This kit came from Trinity Amps in Toronto, Canada. Stephen Cohrs, owner of Trinity amps, initially called it his OverDrive Special (ODS) kit. But, Andy Fuchs of Fuchs Audio had trademarked this name and made Trinity cease and desist using it. I find that interesting. Andy Fuchs copied Howard Alexander Dumble’s design, used the name Dumble had used for decades, but never trademarked, and now Andy Fuchs owns and controls the name. Sheesh. Stephen Cohrs had to change the name of his amp to Overdrive Special Design (OSD).

The Trinity OSD is one of the most affordable Dumble designs on the market – you can buy it built by Trinity for about $2,300. Most of the other manufacturers like Fuchs offer them for $3,000-$4,000. Building it yourself will run about $1,100.

This build has been my latest obsession – I intially told myself to limit my time to about two hours per day on this kit to stay fresh and sharp. That didn’t work. I spend hours each day laying it out, checking and rechecking against the schematic and layout guides and then soldering and rechecking everything again. I’ve caught a few errors, but it’s mostly gone well. One of the hardest parts was positioning and soldering 11 jumper wires under the eyelet board. The layout shows the jumper wires in a ghost view from the top side of the board. There are dozens of eyelet holes in the board so when you flip it over to position the wires, it’s a reverse image of the layout view. I wired it, checked it and rewired it a few times before I was satisfied and hot glued the wires in position. Here’s a pictorial review of the work so far.

Chassis with tube sockets and rear hardware installed
Chassis with front controls (potentiometers) and switches installed

Some of wiring needs to be twisted or braided. Wires, particulary those carrying alternating current (AC) need to cross each other at 90 degree angles to prevent induction. The output transformer has five wires on one side and four on the other that needed to be braided. I found braiding five was easier than four, but they both came out fine.

Output transformer with five wire braid on one side
Four wire braid on the other side
Ground bus installed and wired, components installed on tube sockets
My home made amp chassis stand and work station
Power transformer (PT) and output transformers (OT) installed on other side of the chassis and wiring in place – the yellow twisted wires are 5-volt AC for the relay board which I built before installing in the chassis
Power transformer and output transformer
Populating the main eyelet board and installing flying leads for controls and tube sockets

That, in a nutshell represents five days of work.

No post is complete without a food picture. Donna is the head chef around here, but I do my share with the Traeger Smoker/Grill and I also make an incomparable Japanese fried rice. My other specialty is the breakfast omelette. My technique is a little unusual in that I flip the egg like a flapjack. I pour the whipped eggs and milk into a non-stick skillet with melted butter. Once the egg starts to solidify, I give the skillet a flick of the wrist and voila! The egg flips and I remove it from the heat and add the filling. Perfection if I say so myself.

Breakfast omelette with Italian seasoned broccoli, bacon and sharp cheddar cheese filling

Donna made a couple of simple, delicious comfort favorites this week. First up, Baja blackened fish tacos.

Fish taco – yummy

Last night she made white chicken chili – a favorite and just right for Sunday Night Football with bottle of Four Peaks Kiltlifter ale.

White chicken chili – pictured without the crumbled corn chip topping

This morning, we’re having our house power washed. They power wash the siding, remove the sunscreens for cleaning and wash the windows, then finish up by washing the decks and carport.

The last couple of days have been on the warm side with highs of 91-92 degrees. The swamp cooler is keeping things comfortable though. Looking ahead, we should see highs around 80 degrees with a couple of warmer days maybe on Thursday and Friday.

Donna will be flying to Florida on Thursday to visit her sister Linda in Sarasota. They will drive to Miami on the weekend for her niece’s wedding celebration – she was actually married last year but the planned wedding couldn’t be carried out due to COVID lockdowns. I’ll be a bachelor from Thursday to Wednesday.

*Just so you know, if you use this link to shop on Amazon and decide to purchase anything, you pay the same price as usual and I’ll earn a few pennies for the referral. It’ll go into the beer fund. Thanks!

Touchpads and Tokyo Calling

I didn’t get out of bed until 7:30am this morning. We’ve been getting up a little earlier than usual to hit the pickleball courts between 8:00 and 8:30am. We played a couple of hours per morning every day Monday through Friday this week. My left knee was starting to be bothersome – it would start getting sore after an hour or so, then stiffen up and remain sore throughout the rest of the day.

I ordered a pair of knee compression sleeves from Amazon and started using one on Thursday. It seems to help, I’ll continue to wear it on my left knee whenever I play pickleball.

Donna had a great idea to get me out of bed – she suggested we head over to Crackers & Co. for breakfast. It’s only a few miles away on Greenfield north of Brown Road. They have outdoor seating on a patio and excellent coffee. The service was fast and the breakfast good – Donna had eggs Benedict while I went for the biscuit and gravy dish with two eggs and country fries. While we were out, we hit the Walmart a half mile up Greenfield before we came home.

I had a project I wanted to complete and for once, it went smooth and easy. Our coach is equipped with an HWH hydraulic system that operates the leveling jacks and also operates the slide-outs. After 17 years of use, the touchpad controller was wearing out. The flexible plastic cover of the touch pad had worn through in a few places and the copper contacts weren’t conducting very well. I had to play around with the pressure points to make contact and operate the HWH system.

Worn HWH controller touchpad

I had a hard time finding a retailer that carried a replacement touch pad and printed circuit board (PCB) controller. I was getting worried about the PCB failing completely and preventing me from operating the jacks. I finally found replacement HWH parts including touchpad PCBs at Northwest RV Supply in Eugene, Oregon.

Their online catalog had several pages of HWH touchpads listed and warned customers not to order based on appearance or specifications. They said the only way to ensure the correct touchpad and PCB was ordered is to remove the old PCB and look for a part number handwritten with a sharpie-type pen on the PCB. I thought this was a little strange, but I pulled the old touchpad while we were in Buckeye and found the handwritten part number.

Handwritten part number on old PCB

When I found the replacement part for AP1088, there was another warning. It said to call for lead time. Apparently HWH makes various PCBs in batches, if they are out of stock, it may be weeks or even months before they run that particular part number again. I called Northwest RV Supply and they told me it would take three to five days for the replacement part to drop ship from HWH. The replacement part cost was $181.

I ordered the part a week ago and received it yesterday. It was easy to replace – I just removed the old one and pulled the 10-pin connector. Then it was just a matter of putting the connector on the pins of the new PCB and screwing back in place.

New touchpad with PCB

With the ignition key in the accessory position, I powered up the HWH and tested the jack operation. All is good, job done!

I had a couple of interesting ham radio contacts this week. On Thursday afternoon, I was operating on the 20-meter band at 14.327 MHz when I heard a station calling from Japan. The 20-meter band is High Frequency (HF) which operates long distance through something called skywave propagation. What happens is the electromagnetic signal from my antenna travels at an upward angle 150 to 300 miles into the upper atmosphere where it hits the ionosphere. The electromagnetic signal is reflected (actually it’s refracted as it can come back down through more than one path) back to earth. This will usually cover anywhere from 300 to 2,500 miles, depending on the angle of travel of the original signal.

This signal can bounce off the earth and travel back to the ionosphere to be reflected back again. As it makes these “skips,” the footprint the signal covers gets progressively larger.

Anyway, I answered the call from Japan and made contact with Haruo. Haruo-san lives north of Tokyo and, from what I gathered, he lives out in the country at high elevation and has an elaborate antenna and ham rig. To reach Tokyo, my signal had to skip at least twice as Tokyo is about 5,700 miles from Mesa, Arizona. The thing about skywave propagation is the ionosphere is constantly changing and what was a good signal can suddenly fade. This happened to me shortly after I made contact with Haruo-san.

Last night, I was operating on an Ultra High Frequency (UHF) band. These frequencies don’t work like HF bands, UHF requires line-of-site contact and doesn’t skip off the ionosphere. I connected to the East Valley Repeater Group station on South Mountain about 26 miles from here. Once I established a digital connection with the EVRG repeater, I utilized their Yaesu WIRES-X node. This is a link through a computer that sends the digital signal over the Internet through a program called voice over Internet protocol (VOIP).

The WIRES-X system links around the world through “rooms.” Once I was into the EVRG WIRES-X node, I selected a room called Texas-Nexus and coincidentally, heard a guy talking from Japan. I made contact with Masaaki Miyomoto (JA1WLQ) in Tokyo, Japan. Masaaki-san has been a ham operator since his junior high school days – he’s 69 years old now.

He was a little surprised when I told him about talking to Haruo-san the day before on HF. Then he found out Haruo-san was located on a rural mountain. Masaaki-san lives in the city and he told me it was nearly impossible to get a good HF antenna mounted anywhere within Tokyo. He really embraces the new technology and loves to make contacts in the USA with WIRES-X VOIP. He also talks to hams in Italy and France – he’s multi-lingual.

We had a long discussion about cultural differences between our two countries. We also talked about the RV lifestyle which he found very interesting – it’s something that rarely happens in Japan. Our session was suddenly cut off. I re-connected and asked Masaaki-san what happened. He reminded me that most repeaters will “time out” if connected to a room for more than 30 minutes. I lost track of how long we had been talking.

The thing about digital VOIP contact is the clarity. You don’t have to rely on electromagnetic signals subjected to the whims of the atmosphere. If you can connect to a local repeater that supports linked VOIP systems like WIRES-X or Winsystem, the signal is so solid it’s like you’re talking to someone across the table from you, not across the Pacific Ocean! Enough radio talk.

Donna whipped up a really tasty dish for dinner on Thursday. She made jerk shrimp with mango salsa and served it with asparagus and forbidden rice. It’s a fairly quick and easy dish – I think the mango salsa is probably the hardest part.

Jerk shrimp with mango salsa

I bought a rack of babyback ribs at Walmart this morning. I think I’ll set up the Traeger and smoke them tomorrow.

We’ve had warm weather with mostly clear skies – only a few high, thin clouds – and daily temperatures with a high of about 90 degrees. Today’s forecast calls for a high of 83 and the same for tomorrow before it cools to the lower 70s starting on Monday. That sounds about perfect.

*Just so you know, if you use this link to shop on Amazon and decide to purchase anything, you pay the same price as usual and  I’ll earn a few pennies for the referral. It’ll go into the beer fund. Thanks!

Amped Out

Labor Day weekend signals the end of summer for many people. Labor Day is always the first Monday in September. It seems like the summer flew by – we were preoccupied with the pandemic for the last six months. It’s been unusually hot almost everywhere we traveled this summer, including here in Grangeville, Idaho. The average high here in August is 82 degrees, dropping to 72 degrees for the month of September. This week we had upper 80s and 92 degrees yesterday.

I mentioned the Sundown RV Park where we’re staying only has 30-amp electrical service. I know I’ve posted about the difference between a 50-amp service and a 30-amp before, but it bears repeating. Taken at face value, it would seem the difference is only 20 amps, but that’s not so.

When an RV is built with 50-amp service in mind, the electrical circuit is split into two legs – L1 and L2. There are four contacts at the pedestal and plug – two hot leads (L1 and L2), a common and a ground. Half of the appliances and outlets are wired to L1 and the rest are wired to L2. Each leg provides up to 50 amps of power for a total input of up to 100 amps.

An RV wired for 30-amp service has only three contacts – one hot lead, one common and a ground. Every electrical consumer in the coach is wired to the one hot lead. So, the total power available is up to 30 amps – that’s 70 amps less than a 50-amp service.

Our coach is wired for 50-amp service, so when we have 30-amp service we use an adapter commonly called a dog bone.

It’s called a dog bone because of the round plug ends and narrow center section

The adapter takes the single 30-amp hot lead and splits it to provide current on L1 and L2 of the 50-amp plug. But, it can only provide a total of 30 amps. In our coach the L1 is wired to the front air conditioner, water heater and outlets on one side of the coach. L2 powers the rear air conditioner, inverter/converter keeping our batteries charged, microwave oven and the rest of the outlets.

Each 15,000 BTU air conditioner unit consumes about 15 amps of current. If we run both units we would be at the 30-amp limit and any other consumer would mean excess current and a tripped breaker at the pedestal.

With the high temperatures, we want air conditioning. So, we closed off the rear of the coach by closing the pocket door that separates the galley area from the bathroom, effectively cutting the coach in half. We only run the front air conditioner keeping the living room/dining/kitchen area cool. With only one air conditioner running, we still have to be mindful of any other appliances such as the microwave/convection oven. We only have about 15 amps of current available. Anything with a heating element is a big power consumer.

We always hook up through a Progressive Industries Electrical Management System (EMS) with surge protection. This unit will protect the coach from improperly wired pedestals, low voltage or high voltage and a host of other features. It also allows me to monitor the current draw of the two coach circuits.

Progressive Industries EMS
L1 amperage – air conditioner running
L1 incoming voltage
L2
L2 amperage
L2 incoming voltage

In the photos above, you can see we are drawing 14 amps on L1 and 8 amps on L2 for total of 22 amps. We only have eight more amps available – anything drawing more than eight amps would put us over the 30-amp limit and trip the breaker. When we are connected to a 50-amp service, we have no worries with a total of 100 amps available and can run whatever we need in the coach.

Yesterday, I completed a long overdue task. One of the struts (gas spring) on our awning blew out a while back. This allowed one side of the awning to collapse. I ordered a replacement from Dometic and have had it on hand for quite a while, but I never tackled the job as it seems that something always prevented me from diving into it. Either it was two windy to deal with the awning or we had some obstacle preventing me from extending the awning.

Well, I had no excuses Saturday morning. I broke out the ladders and a few tools and got after it. I figured there would be two difficult parts – compressing the gas spring to get it lined up with the mounting pins and putting the serrated retainer washers on the pins. It turned out that getting the mounts lined up was fairly easy, the retainers were a pain just as I thought they would be.

Gas spring strut

The difficulty installing the retainer was due to having to secure the pin in place while using a deep 14mm socket to pound the inner serrations over the pin. I had to enlist Donna’s aid – she held the pin in place with channel lock pliers while I positioned the socket over the retainer and tapped it with a hammer. Job done! Our awning is back in business and helping to keep direct sun off the coach.

Last evening Donna prepared a simple, delectable meal. She grilled bone-in, skin-on chicken thighs using a grill mat on the Weber Q. She also made baked garlicky zucchini with tomatoes and parmesan cheese to go with it. The chicken was crispy and simply seasoned with salt and pepper.

Delicious simple dinner

This morning, we drove across town – a distance of about 10 blocks – to Pioneer Park for the weekly farmers’ market. I’ve noticed that city parks in small towns tend to be used a lot by families with children. This park fits that – it also has a community swimming pool, but unfortunatel,y it closed for the season on August 31st.

Farmers’ market

Donna made some great buys on fresh produce, but we missed out on farm fresh eggs. They were sold out within half an hour of opening. At one end of the market, a bluegrass group set up and was playing. It was interesting music with guitars and fiddles, but no banjo.

Bluegrass in the park

Donna’s out on her bike as I type this. She’ll have some photos of her ride for my next post, no doubt. She’s trying to beat the heat as it’s supposed to reach 88 degrees today. The forecast calls for cooler weather beginning on Monday with a high of 70 degrees. Good timing once again as I’ll start packing Monday afternoon. We plan to leave Grangeville and head south on US95 Tuesday morning. We have a couple of boondocking options lined up for a few nights, then we’ll check in at Gem State Campground in Mountain Home, Idaho for three nights.

*Just so you know, if you use this link to shop on Amazon and decide to purchase anything, you pay the same price as usual and  I’ll earn a few pennies for the referral. It’ll go into the beer fund. Thanks!