My energy levels and activity have been fairly low lately. Recovering from surgery is taking longer than I expected – I guess that’s what happens as you age. A couple of times per day I find myself overcome with fatigue and need a short power nap – but I’m making progress.
Speaking of progress, Donna’s raised garden bed is producing some good looking vegetables. She has tomatoes ripening, broccoli that looks amazing and collard greens along with a nice basil plant. It’s taking a bit longer for the veggies to ripen than we expected – the unusually cold weather has had a hand in that.
While the garden is Donna’s project, I manage the worm farming. We have an in-bed worm bin in the garden. The worm bin has openings in the sides that allow the worms to come and go freely and travel throughout the garden. I feed the worms in the bin, so the majority of them reside there.
The composting worms are red wigglers and they create an ideal soil with organic, natural fertilizer. The worms require a diet of nitrogen-based material – this is derived from kitchen vegetable scraps, peat moss and manure. They also need carbon based nutrients – I provide this by adding shredded cardboard to their bin. That’s right, they convert kitchen waste and cardboard into ideal garden soil. As they consume these waste products, they leave behind worm castings – a polite descriptor for worm poo. It contains beneficial bacteria as well as nitrogen, phosphorus and potassium – the NPK values you see on commercial fertilizers. Worm castings are natural, organic fertilizer that will not burn your garden plants – you can plant in 100% worm castings to great effect!
I started Donna’s in-bed worm bin with 300 red wigglers from Arizona Worm Farm. These worms dispersed – probably because her garden soil had so many nutrients they didn’t need to stay in the bin to feed. I added 300 more worms two weeks later and I feed the bin regularly.
Worm reproduction is interesting. Worms are hermaphrodites – that is they have both male and female reproductive organs. But it still takes two to tango. Once they’ve completed the dance, both participants are fertilized. They each produce cocoons that can hatch two to five worms. So, let’s say that one-third of the original 600 worms have an encounter – that’s 200 worms that will produce cocoons. Let’s say that two worms survive from each cocoon. Our 200 worms just produced 400 offspring. I think this represents a low estimate of the worms’ reproductive activity. For the past few weeks, every time I aerate the worm bin and add food, I find bunches of young worms. I have little doubt that Donna’s garden houses well over 1,000 worms now and the population will continue to grow.
Worm colonies are self regulating – that is, when the population reaches a saturation point where food and space become less than abundant, they slow or stop reproduction. Pretty handy.
Five weeks after I started the in-bed worm bin, I created a separate external worm bin. I used 20-gallon fabric pots called grow bags. I doubled two together for strength, added some garden soil mix, peat moss, perlite and cardboard. I started this bin with 600 red wigglers with the intention of creating a steady supply of worm castings for Donna’s potted plants and whatever else she grows.
Enough about worms – let’s talk astrophotography. When I decided to pursue astronomy last summer, I didn’t really know what I wanted from it. Like many beginners, I figured I should get as large a telescope as I could afford and skip past the beginners’ “toy” telescopes. I’ll have to delve into a few ‘scope dimensions to explain this, but I’ll skip the math equations.
My first scope was a Schmidt-Cassegrain reflector – it’s what’s known as a catadioptic telescope – often shorted to cat or just SCT (Schmidt-Cassegrain telescope). The Celestron NexStar 8SE I bought has a large objective (that’s the front lens opening on a refractor or the mirror size of a reflector type ‘scope) of 8-inches (203mm). It has a focal length of a whopping 2,032mm. Objective diameter and focal length are factors in determining how much magnification the ‘scope can provide.
I had a lot of fun looking at the moon and planets like Saturn and Jupiter. But I also found out that high levels of magnification also means unwanted atmospheric disturbances are also magnified. I soon discovered that I was most interested in taking photographs of the celestial objects rather than observing them through an eyepiece.
I bought a dedicated planetary astrophotography camera and captured a lucky image of Saturn. That really got me excited about astrophotography. I soon learned how lucky that image was. Most of the time, I couldn’t get the moon or planets in sharp enough focus as atmospheric conditions like temperature gradients and higher level winds (jet stream) made the image go in and out of focus.
The moon and planets are bright enough to capture with very short exposures. The trick was to get focused as sharp as possible, then start capturing frames with short exposure times – around 10 milliseconds or so. I would take 3,000 or more frames. Later, I sorted these frames by quality level in a software program, threw out the poor examples lacking detail and combined the best images in a stacking program. This yielded acceptable results, but they were still lacking.
There are a lot of great YouTube videos where experienced astrophotographers offer advice and tutorials. I learned that most of them agreed that starting out with a large, high magnification ‘scope would only lead to frustration. They almost universally agreed that a smaller refractor-type telescope would yield better results and even forgive some beginner errors. This allows far less frustration as you gain experience.
So, I found a small William Optics ZenithStar refractor with a 73mm objective and 430mm focal length. This was a treat for lunar photography, but a little small for planetary use. If you wanted to go past our solar system, it would excel at some nebulae and distant galaxy images – but I was still working on planetary photography.
Then I found my Goldilocks ‘scope – not too big and not so small. I bought an Astro-Tech 115EDT. This has an objective lens diamter of 115mm and a focal length of 805mm. I love this scope and also my W.O. Z73. I’ve become a refractor guy instead of a reflector ‘scope guy.
Here’s how the three ‘scopes fit my needs. The small W.O. Z73 with a focal length of 430mm works for lunar and deep-sky objects (DSO). The Astro-Tech 115EDT with a focal length of 805mm works for lunar and planetary – it will also be useful for DSO. The Celestron 8SE with a focal length of 2032mm is good for planetary and deep sky if the atmospheric conditions allow it.
But wait, there’s more. With the 115 EDT, I can use an accessory called a Barlow that effectively doubles the focal length from 805mm to 1610mm. Barlows have plusses and minuses, but I won’t delve into that here. It gives me enough magnification for great planetary images. With the 8SE, I can use another accessory called a focal reducer that effectively shortens the focal length. I have a 0.63 focal reducer for it that shortens the 2032mm focal length to 1280mm. So I have a lot of options now – focal lengths of 430mm, 805mm, 1280mm, 1610mm and 2032mm. That’s why I have three telescopes – and five focal length options.
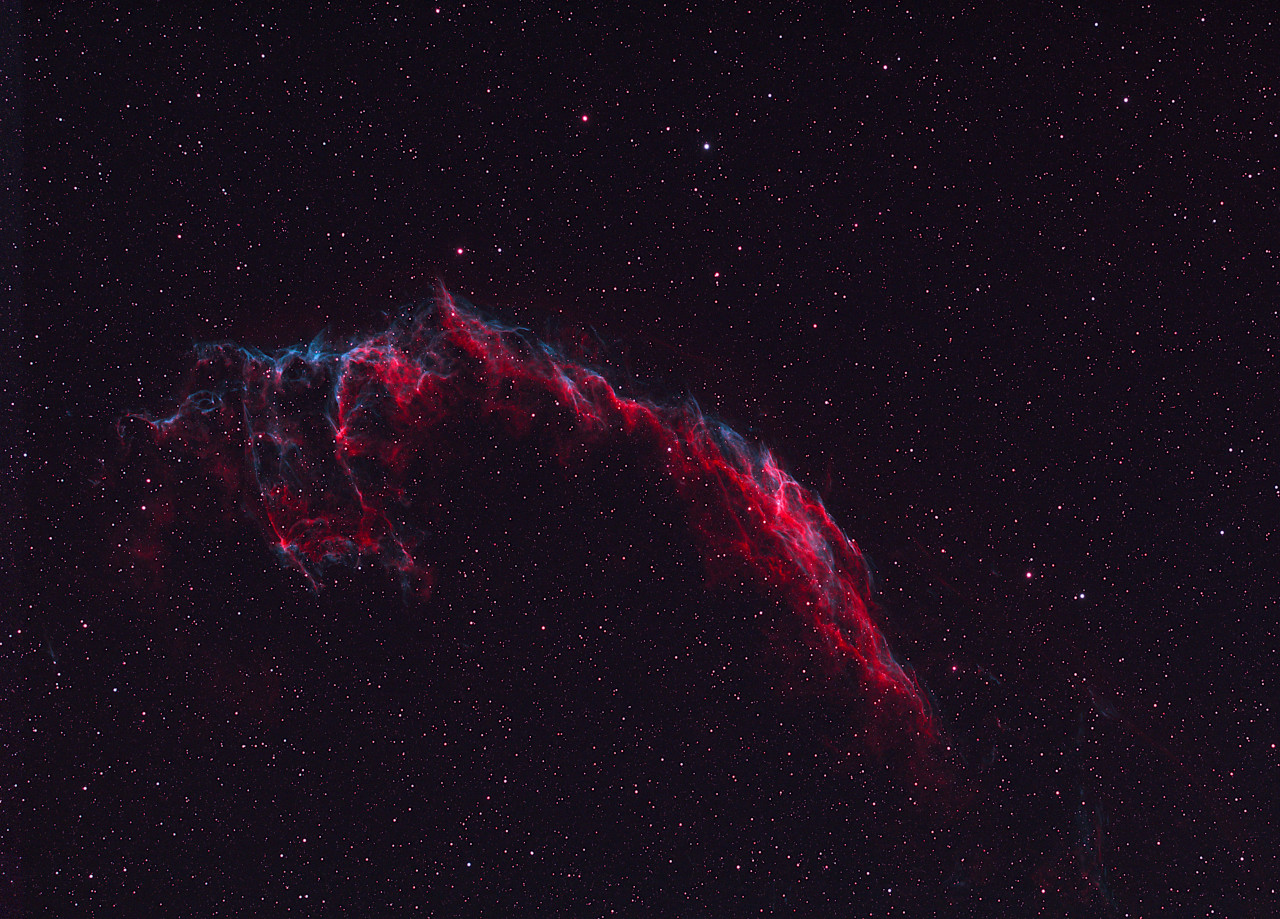
A few weeks ago, I went to an area with less light pollution and tried to capture a deep-sky image of the Pleiades – a star cluster also called the Seven Sisters. My planetary experiences were no help here. DSO are a different game and have completely different requirements. Instead of short exposures of only milliseconds, you need long exposures – several minutes for each frame.
These long exposure create new difficulties and requirements to overcome them. Due to the earth constantly rotating, you must be able to accurately track the celestial position of your target. Otherwise, stars would go from pin-points to streaks across the image.
Digital cameras use sensor chips to convert photons of light into electrical impulses that can be recorded as data and later decoded into images. Astrophotography cameras typically use sensors developed by Sony Corporation and they are available in many configurations. My planetary camera uses a small chip size and doesn’t require cooling as the short exposure times don’t create much heat in the chipset. However, it doesn’t work well for long exposures as the chip overheats and creates noise in the image – that is, unwanted artifacts and false color or random white points in an otherwise black portion of the image.
Astrophotography cameras for DSO have cooled sensors. They usually have a thermo-electric (Peltier) cooling system that doesn’t use any liquid or gas cooling medium, it’s strictly electrical. This increases the size and weight of the camera not to mention the cost.
I went for it and bought a cooled DSO camera and a host of other accroutrements to begin DSO imaging. I run the cooling system of my ZWO ASI533MC deep sky astrophotography camera at a temperature of -12 celsius – that’s right, below freezing – it’s about 10 degrees fahrenheit.
This post has become too long-winded, so I’ll continue the DSO journey in another post. I think I’m ready for a nap now.

Let’s see some pictures of the garden and vegetables
You’re right – I need to take more photos.
Still fascinated with your progress in the astrophotography & even learned a lot about red wrigglers,lol.
Thanks for the update,all the best